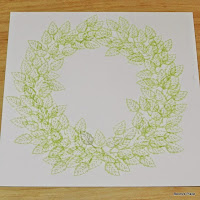
I took part in the November month of holiday cards at Beccy's Place
Beccy showed us some lovely cards and did some tutorials. You can see them all at
I asked Beccy if I could use one of her tutorials for my inspiration post on Feeling Sketchy and she has given me permission.
http://feeling-sketchy.blogspot.com.au/
http://feeling-sketchy.blogspot.com.au/
On Day 15, Beccy used a large leaf stamp to construct three dimensional poinsettias for her card. On day 22 She used a small leaf stamp, from the "Lovely As A Tree" set, to create a Christmas wreath.

She also gave us this tutorial:
Use a small stamp and three shades of ink to create a holiday wreath.
You'll need a small foliage stamp and at least three shades of green ink. If you don't have a small leaf stamp, consider using a fern, flower, butterfly or heart - as long as it's small it will work.

Draw a feint circle on your piece of cardstock with a pencil. This will form the basic shape of your wreath and can be rubbed out once you have finished stamping.
Start stamping with the lightest of your inks. Begin at the centre bottom of the circle and stamp up one side until you reach the centre top. Repeat for the other side as shown in the photo below.

Fill in the wreath making sure you tilt the stamp in different ways as you work your way around the circle. Try to keep the wreath an even thickness all the way around.

Now ink the stamp using the middle shade. Starting in the centre at the bottom, stamp in the darker leaves working around until you're about half way up each side.

Now re-ink the stamp in the first colour (the lightest shade) and touch the stem of the leaf into the middle shade again. Stamp the rest of the way up the wreath on both sides. This will help to prevent a sudden, and very obvious, change in colour.

Repeat the process with the darkest colour, but only work about 1/4 of the way up each side of the wreath. Re-ink with the middle colour and again tip the stem into the darkest colour to prevent sudden colour changes.

Now decorate!
The above tutorial used by permission from Beccy's Place
http://www.beccysplace.blogspot.com.au/
I tried to follow this tutorial but I couldn't find a small leaf stamp so used another stamp I had and only two stamp pads. My card doesn't look anything like Beccy's. I will have another try when I find the right stamp. I hope you will have a go at this and do a better job than I did.
Instructions for my card are on my blog at


2 comments:
This is gorgeous and I love that you showed us how it was done. Wonderful. Must give this a go.
Hugs
xx
very beautiful
Post a Comment